

WEB HOSTING

INTRODUCTION:
The LEMP stack, a potent combination of Linux, Nginx, MySQL, and PHP, forms the backbone of many dynamic websites and web applications. This blog post will guide you through installing the LEMP stack specifically on Ubuntu 22.04, offering a streamlined setup for your development environment. Since Ubuntu provides the Linux foundation, let’s focus on installing and configuring the remaining components of the LEMP stack. This guide is to install the Nginx, Mysql and PHP. Let’s dive into the session.
A system running Ubuntu 22.04.
Basic understanding of the command line.
Root or sudo access.
Step 1 – Installing the Nginx Web Server:
To ensure smooth delivery of web pages to visitors, we’ll set up Nginx, a robust web server. We use the APT package manager, simplifying the installation process. To get started, we need to update the information about available software on your server.
sudo apt update However, after completing the previous steps, run the following command in your terminal to install the Nginx web server:
sudo apt install nginx During installation, press “Y” and Enter to confirm the installation of Nginx. Once finished, the Nginx web server will be up and running on your Ubuntu 22.04 server. If you enabled the ufw firewall (recommended), you will need to allow connections to Nginx. Nginx registers firewall profiles during installation.
To see available profiles, run:
sudo ufw app list output:
Available applications:
Nginx Full
Nginx HTTP
Nginx HTTPS
OpenSSH
Nginx Full
Nginx HTTP
Nginx HTTPS
OpenSSH
We recommend starting with a secure firewall configuration that allows only the essential traffic. In this guide, as we have not set up SSL, only regular HTTP traffic on port 80 needs will allowed, keeping things simple and secure.
Enable this by running the following:
sudo ufw allow 'Nginx HTTP' You can confirm if the change was successful by checking the status.
To check the available status run the following command:
sudo ufw status Analysis of the output reveals that the system is not blocking HTTP requests.
OUTPUT
Status: active
To Action From
-- ------ ----
OpenSSH ALLOW Anywhere
Nginx HTTP ALLOW Anywhere
OpenSSH (v6) ALLOW Anywhere (v6)
Nginx HTTP (v6) ALLOW Anywhere (v6)
To Action From
-- ------ ----
OpenSSH ALLOW Anywhere
Nginx HTTP ALLOW Anywhere
OpenSSH (v6) ALLOW Anywhere (v6)
Nginx HTTP (v6) ALLOW Anywhere (v6)
After adding the firewall rule, you can test if your server is functioning by your server’s domain name or public IP address in your web browser. If you need your server’s public IP address, but you do not have a domain name configured.
These commands will help you track it down:
ip addr show hostname -I
Above commands will provide some IP addresses. Test each file individually by opening them in your web browser.
For verification, you can check the IP address from a different location on the internet.
curl -4 icanhazip.com
Enter the following address in your web browser to access the default Nginx landing page:
http://server_domain_or_IP
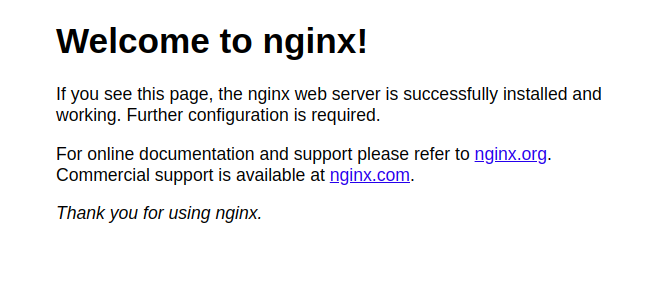
The above page indicates a successful Nginx installation with HTTP traffic enabled.
Step 2 — Installing MySQL:
The next step involves installing a database system to store and manage your website’s data. Since you already have a web server running, and MySQL is a popular option for PHP websites,
Use apt to install it.
sudo apt install mysql-server
To enhance security after installation, run the pre-installed MySQL security script. This script removes vulnerable settings and restricts access to your database. Use the following command to start the interactive script:
sudo mysql_secure_installation The next step is you will be prompted with asking question that if you want to configure the Password Plugin.
You can choose to enable password validation, which will enforce stricter password rules. However the most important security measure is always using strong,unique database passwords regardless of validation settings.
Press any key to continue, or type “y” and press Enter to enable this feature.
VALIDATE PASSWORD COMPONENT can be used to test passwords
and improve security. It checks the strength of password
and allows the users to set only those passwords which are
secure enough. Would you like to setup VALIDATE PASSWORD component?
Press y|Y for Yes, any other key for No:
and improve security. It checks the strength of password
and allows the users to set only those passwords which are
secure enough. Would you like to setup VALIDATE PASSWORD component?
Press y|Y for Yes, any other key for No:
“Yes” if your answer, then you will be asked to select a level of password validation. Remember, it if you entered 2 for the strongest level, you will get a errors when you attempt to set a password because it does not contain lower case, upper case, numbers and special characters.
There are three levels of password validation policy:
LOW Length >= 8
MEDIUM Length >= 8, numeric, mixed case, and special characters
STRONG Length >= 8, numeric, mixed case, special characters and dictionary file
Please enter 0 = LOW, 1 = MEDIUM and 2 = STRONG: 1
LOW Length >= 8
MEDIUM Length >= 8, numeric, mixed case, and special characters
STRONG Length >= 8, numeric, mixed case, special characters and dictionary file
Please enter 0 = LOW, 1 = MEDIUM and 2 = STRONG: 1
Whether or not you enabled the VALIDATE PASSWORD PLUGIN, the MySQL installation process will require you to set a strong password for the MySql root user. Remember, this is not the same as your system root password. The database user is like an administrator with unlimited access to your database. Although MySQL doesn’t force you to set a password for this account, its highly recommended that you create a strong password as a security precaution. We will cover this more in a moment.
If you enabled password validation, the system will display the strength of your chosen root password and ask for confirmation. To proceed, press “Y” (yes) at the prompt if you are satisfied with its security.
OUTPUT
Estimated strength of the password: 100
Do you wish to continue with the password provided?(Press y|Y for Yes, any
other key for No) : y
Do you wish to continue with the password provided?(Press y|Y for Yes, any
other key for No) : y
For the remaining questions, Press “Y” and then the “ENTER” key at each one to remove unused accounts, limit remote access, and make your changes effective immediately.
Once you’ve completed these steps, verify your access by logging into the MySQL console.
sudo mysql -u root -p Running this command with sudo implies you are connecting as the administrative user “root”, where as -u represents user and -p represents password to prompt. By entering the password, you should expect the following output:
OUTPUT
Welcome to the MySQL monitor. Commands end with ; or \g.
Your MySQL connection id is 10
Server version: 8.0.28-0ubuntu4 (Ubuntu)
Copyright (c) 2000, 2022, Oracle and/or its affiliates.
Oracle is a registered trademark of Oracle Corporation and/or its
affiliates. Other names may be trademarks of their respective
owners.
Type 'help;' or '\h' for help. Type '\c' to clear the current input statement.
mysql>
To exit the MySQL console,write the following:
exit You might also use sudo mysql to connect as the root user without entering password, even though you set one during the mysql_secure_installation. This is because, on Ubuntu, the default authentication method for the root MySQL user is called “auth_socket” which doesn’t require a password. Instead, it relies on your system privileges for access. While allowing logins only with sudo privileges might raise an eyebrow initially, it actually enhances security. This is because only authorized system users with elevated access can log in as the root MySQL user, either directly on the console or through trusted applications with the same permissions.
While technically possible, it’s strongly advised against using the “root” user for your PHP applications database connection. Instead, create a user with the necessary permissions.
Security first! To minimize risk, create separate user accounts with limited permissions for each database. This becomes even more crucial if you plan to manage multiple databases on your server.
Your MySQL server now installed and secured. The final step in setting up the LEMP stack involves installing PHP.
Step 3 – Installing & Configuring PHP:
With your web server (Nginx) ready to deliver content and your database (MySQL) storing and managing information, you are now set to install PHP. This adds the ability to process code and create dynamic content for your website, making it more interactive and engaging.
Apache embeds the PHP interpreter directly within each client request. Nginx relies on a separate program to handle PHP processing. This external program acts as an intermediary between the PHP interpreter and the web server, potentially leading to improved performance for websites built with PHP. However, this approach also necessitates additional configuration steps. To enable Nginx to handle PHP requests, you’ll need to install the php8.3-fpm package.
The term “php-fpm” stands for PHP FastCGI Process Manager. The “8.3” indicates that it specifically works with the current version of PHP (8.3 at the time of writing). Installing this package acts as a bridge, instructing Nginx to forward PHP requests to this external software for processing.
While installing php-fpm is crucial for Nginx to process PHP requests, your web application might also need to interact with MySQL databases. To facilitate this communication, you’ll need the additional php-mysql package, which provides the necessary libraries and functions.
To install both php8.3-fpm and php-mysql packages, use the following command in your terminal:
sudo apt install php8.3-fpm php-mysql Press Y and ENTER to confirm the installation.
Now, PHP components have installed successfully. Next step to configure Nginx to use them.
INTRODUCTION:
The LEMP stack, a potent combination of Linux, Nginx, MySQL, and PHP, forms the backbone of many dynamic websites and web applications. This blog post will guide you through installing the LEMP stack specifically on Ubuntu 22.04, offering a streamlined setup for your development environment. Since Ubuntu provides the Linux foundation, let’s focus on installing and configuring the remaining components of the LEMP stack. This guide is to install the Nginx, Mysql and PHP. Let’s dive into the session.
A system running Ubuntu 22.04.
Basic understanding of the command line.
Root or sudo access.
Step 1 – Installing the Nginx Web Server:
To ensure smooth delivery of web pages to visitors, we’ll set up Nginx, a robust web server. We use the APT package manager, simplifying the installation process. To get started, we need to update the information about available software on your server.
sudo apt update However, after completing the previous steps, run the following command in your terminal to install the Nginx web server:
sudo apt install nginx
During installation, press “Y” and Enter to confirm the installation of Nginx. Once finished, the Nginx web server will be up and running on your Ubuntu 22.04 server. If you enabled the ufw firewall (recommended), you will need to allow connections to Nginx. Nginx registers firewall profiles during installation.
To see available profiles, run:
sudo ufw app list OUTPUT
Available applications:
Nginx Full
Nginx HTTP
Nginx HTTPS
OpenSSH
Nginx Full
Nginx HTTP
Nginx HTTPS
OpenSSH
We recommend starting with a secure firewall configuration that allows only the essential traffic. In this guide, as we have not set up SSL, only regular HTTP traffic on port 80 needs will allowed, keeping things simple and secure.
Enable this by running the following:
sudo ufw allow 'Nginx HTTP' You can confirm if the change was successful by checking the status.
To check the available status run the following command:
sudo ufw status Analysis of the output reveals that the system is not blocking HTTP requests.
OUTPUT
Status: active
To Action From
-- ------ ----
OpenSSH ALLOW Anywhere
Nginx HTTP ALLOW Anywhere
OpenSSH (v6) ALLOW Anywhere (v6)
Nginx HTTP (v6) ALLOW Anywhere (v6)
To Action From
-- ------ ----
OpenSSH ALLOW Anywhere
Nginx HTTP ALLOW Anywhere
OpenSSH (v6) ALLOW Anywhere (v6)
Nginx HTTP (v6) ALLOW Anywhere (v6)
After adding the firewall rule, you can test if your server is functioning by your server’s domain name or public IP address in your web browser. If you need your server’s public IP address, but you do not have a domain name configured.
These commands will help you track it down:
ip addr show hostname -I
Above commands will provide some IP addresses. Test each file individually by opening them in your web browser.
For verification, you can check the IP address from a different location on the internet.
curl -4 icanhazip.com
Enter the following address in your web browser to access the default Nginx landing page:
http://server_domain_or_IP
The above page indicates a successful Nginx installation with HTTP traffic enabled.
Step 2 — Installing MySQL:
The next step involves installing a database system to store and manage your website’s data. Since you already have a web server running, and MySQL is a popular option for PHP websites,
Use apt to install it.
sudo apt install mysql-server
To enhance security after installation, run the pre-installed MySQL security script. This script removes vulnerable settings and restricts access to your database. Use the following command to start the interactive script:
sudo mysql_secure_installation The next step is you will be prompted with asking question that if you want to configure the Password Plugin.
You can choose to enable password validation, which will enforce stricter password rules. However the most important security measure is always using strong,unique database passwords regardless of validation settings.
Press any key to continue, or type “y” and press Enter to enable this feature.
VALIDATE PASSWORD COMPONENT can be used to test passwords
and improve security. It checks the strength of password
and allows the users to set only those passwords which are
secure enough. Would you like to setup VALIDATE PASSWORD component?
Press y|Y for Yes, any other key for No:
and improve security. It checks the strength of password
and allows the users to set only those passwords which are
secure enough. Would you like to setup VALIDATE PASSWORD component?
Press y|Y for Yes, any other key for No:
“Yes” if your answer, then you will be asked to select a level of password validation. Remember, it if you entered 2 for the strongest level, you will get a errors when you attempt to set a password because it does not contain lower case, upper case, numbers and special characters.
There are three levels of password validation policy:
LOW Length >= 8
MEDIUM Length >= 8, numeric, mixed case, and special characters
STRONG Length >= 8, numeric, mixed case, special characters and dictionary file
Please enter 0 = LOW, 1 = MEDIUM and 2 = STRONG: 1
LOW Length >= 8
MEDIUM Length >= 8, numeric, mixed case, and special characters
STRONG Length >= 8, numeric, mixed case, special characters and dictionary file
Please enter 0 = LOW, 1 = MEDIUM and 2 = STRONG: 1
Whether or not you enabled the VALIDATE PASSWORD PLUGIN, the MySQL installation process will require you to set a strong password for the MySql root user. Remember, this is not the same as your system root password. The database user is like an administrator with unlimited access to your database. Although MySQL doesn’t force you to set a password for this account, its highly recommended that you create a strong password as a security precaution. We will cover this more in a moment.
If you enabled password validation, the system will display the strength of your chosen root password and ask for confirmation. To proceed, press “Y” (yes) at the prompt if you are satisfied with its security.
OUTPUT
Estimated strength of the password: 100
Do you wish to continue with the password provided?(Press y|Y for Yes, any
other key for No) : y
Do you wish to continue with the password provided?(Press y|Y for Yes, any
other key for No) : y
For the remaining questions, Press “Y” and then the “ENTER” key at each one to remove unused accounts, limit remote access, and make your changes effective immediately.
Once you’ve completed these steps, verify your access by logging into the MySQL console.
sudo mysql Running this command with sudo implies you are connecting as the administrative user “root”. You should expect the following output:
OUTPUT
Welcome to the MySQL monitor. Commands end with ; or \g.
Your MySQL connection id is 10
Server version: 8.0.28-0ubuntu4 (Ubuntu)
Copyright (c) 2000, 2022, Oracle and/or its affiliates.
Oracle is a registered trademark of Oracle Corporation and/or its
affiliates. Other names may be trademarks of their respective
owners.
Type 'help;' or '\h' for help. Type '\c' to clear the current input statement.
mysql>
Your MySQL connection id is 10
Server version: 8.0.28-0ubuntu4 (Ubuntu)
Copyright (c) 2000, 2022, Oracle and/or its affiliates.
Oracle is a registered trademark of Oracle Corporation and/or its
affiliates. Other names may be trademarks of their respective
owners.
Type 'help;' or '\h' for help. Type '\c' to clear the current input statement.
mysql>
To exit the MySQL console,write the following:
exit You might also use sudo mysql to connect as the root user without entering password, even though you set one during the mysql_secure_installation. This is because, on Ubuntu, the default authentication method for the root MySQL user is called “auth_socket” which doesn’t require a password. Instead, it relies on your system privileges for access. While allowing logins only with sudo privileges might raise an eyebrow initially, it actually enhances security. This is because only authorized system users with elevated access can log in as the root MySQL user, either directly on the console or through trusted applications with the same permissions.
While technically possible, it’s strongly advised against using the “root” user for your PHP applications database connection. Instead, create a user with the necessary permissions.
Security first! To minimize risk, create separate user accounts with limited permissions for each database. This becomes even more crucial if you plan to manage multiple databases on your server.
Your MySQL server now installed and secured. The final step in setting up the LEMP stack involves installing PHP.
Step 3 – Installing & Configuring PHP:
With your web server (Nginx) ready to deliver content and your database (MySQL) storing and managing information, you are now set to install PHP. This adds the ability to process code and create dynamic content for your website, making it more interactive and engaging.
Apache embeds the PHP interpreter directly within each client request. Nginx relies on a separate program to handle PHP processing. This external program acts as an intermediary between the PHP interpreter and the web server, potentially leading to improved performance for websites built with PHP. However, this approach also necessitates additional configuration steps. To enable Nginx to handle PHP requests, you’ll need to install the php8.3-fpm package.
The term “php-fpm” stands for PHP FastCGI Process Manager. The “8.3” indicates that it specifically works with the current version of PHP (8.3 at the time of writing). Installing this package acts as a bridge, instructing Nginx to forward PHP requests to this external software for processing.
While installing php-fpm is crucial for Nginx to process PHP requests, your web application might also need to interact with MySQL databases. To facilitate this communication, you’ll need the additional php-mysql package, which provides the necessary libraries and functions.
To install both php8.3-fpm and php-mysql packages, use the following command in your terminal:
sudo apt install php8.1-fpm php-mysql Press Y and ENTER to confirm the installation.
Now, PHP components have installed successfully. Next step to configure Nginx to use them.